PostgreSQL cluster: partitioning with plproxy (part I)
Skype has developed many handy tools for creating a database cluster and this series of posts is intended to shed some light on their rather undocumented features. At the base of it stand’s plproxy. The best way to describe it’s features would be “dblink on steroids”. This short tutorial will explain how to install plproxy, do simple remote database calls and setup a simple horizontally partitioned database cluster.
Partitioning for dummys
Partitioning let’s you distribute the database load and data between multiple database servers.
The principle itself is simple. Let’s say you have one table that contains the users login credentials but the problem is that there are millions of users that daily log in to their account. This of cause creates a lot of load not talking about the huge table it needs for storage. First we need a criteria based on which we choose what server contains what data. We could do this by the usernames first character. Users from a-j go to first server and usernames beginning with k-z go to the second server. It does work but probably one of the servers gets more load than the other. The most common option is to choose the partition based on the hash of the primary key value, in our case the username. Using a hashing function will distribute the users between servers very evenly. What you need to know about hashing is that hash function basically calculates a number based on any given input it can handle:
select hashtext('kristokaiv1') = 1116512480
select hashtext('kristokaiv2') = 1440348351
select hashtext('kristokaiv3') = -219299073
How it works internally is beyond the scope of this post.
Now let’s say we have 2 partitions, then we could get the partition number based on the username hash like this
partition nr = hashtext($1) & 1
The & 1 will give us the last bit of the number which can be either 0 or 1 which is the number we will use to choose the partition the user data will be stored in. If it’s 0 the data goes to partition 0 and if it’s one the data goes to partition 1
select hashtext('kristokaiv1') & 1 = 0 -> partition 0
select hashtext('kristokaiv2') & 1 = 1 -> partition 1
select hashtext('kristokaiv3') & 1 = 1 -> partition 1
How plproxy works
The concept itself is rather simple – plproxy is a new language created inside the PostgreSQL database that enables to make remote database calls exactly as you do with dblink. The syntax is really straightforward – the following statement creates a new plproxy function in the database that when run will connect to the database remotedb, execute the function get_user_email(text) and return the results.
localdb=#
CREATE FUNCTION get_user_email(username text) RETURNS text AS $$
    CONNECT 'dbname=remotedb host=123.456.123.21 user=myuser';
$$ LANGUAGE plproxy;
Lets create a dummy function in the remotedb that will respond to the call
remotedb=#
create function get_user_email(text)
returns text as $$
    select 'me@somewhere.com'::text;
$$ language sql;
On execution we will see exactly the same results as we would when executing the query on remotedb
localdb=#
select * from get_user_email('tere');
get_user_email
------------------
me@somewhere.com
(1 row)
Of course this is just a really simple example and i will get back to the more complex syntax later, let’s first take a look on how to install the plproxy language.
Installing plproxy
Plproxy can be downloaded from http://pgfoundry.org/projects/plproxy/ but i strongly suggest you get the newest version from the pgfoundry CVS, instructions how to set it up are here. You have to have the PostgreSQL developement environment installed and the folder where the PostgreSQL configuration info tool (pg_config) is needs to be in included in your $PATH variable. If those prerequisites are met then the installation is simple:
$ make
$ make install
$ make installcheck
If you don’t manage to get it working by yourself there is always the mailing list to help you get started.
The final step is to install the language into the database, this can’t be done as for other languages (createlang utility) instead you have to execute the plproxy.sql file that will create the language call handler. locate plproxy.sql is how i found it but it should be somewhere under contrib.
$ psql -f /usr/local/pgsql/share/contrib/plproxy.sql queries
CREATE FUNCTION
CREATE LANGUAGE
Now everything should be done and you can test the setup with the simple plproxy function in the syntax example.
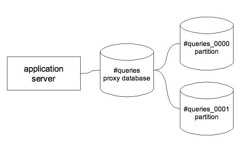
Setting up our first cluster
Let’s create a simple cluster that consists of 3 databases (in my example they are all running on the same PostgreSQL instance). One proxy database called queries and 2 partitions queries_0000 and queries_0001. Horizontal partitioning is done based on username, It’s the most common way for partitioning as most of the data in the database is usually user related eg. users login, users orders, users payments, users settings…
The database cluster setup is stored inside plpgsql functions that plproxy calls.
There are 3 functions that you _MUST_ create for the cluster configuration to work properly. So let’s create them on the proxy database “queries”.
1) plproxy.get_cluster_version(cluster_name text)
This function called on each request and is used to determine if the configuration for a cluster has been changed, if the version number it returns is higher than the cached version number partitions configuration is reloaded. Let’s start with the first version of our configuration like this:
CREATE OR REPLACE FUNCTION plproxy.get_cluster_version(cluster_name text) RETURNS int AS $$
BEGIN
    IF cluster_name = 'queries' THEN
        RETURN 1;
    END IF;
END;
$$ LANGUAGE plpgsql;
2) plproxy.get_cluster_partitions(cluster_name text)
Function should return the connection strings for all partitions in the correct order.
Because of some unreasonable limitation the total count must be power of 2. This is a unreasonable limitation that can easily be overcome but let’s discuss this in another post.
CREATE OR REPLACE FUNCTION plproxy.get_cluster_partitions(cluster_name text) RETURNS SETOF text AS $$
BEGIN
    IF cluster_name = 'queries' THEN
        RETURN NEXT 'host=127.0.0.1 dbname=queries_0000';
        RETURN NEXT 'host=127.0.0.1 dbname=queries_0001';
        RETURN;
    END IF;
    RAISE EXCEPTION 'no such cluster: %', cluster_name;
END;
$$ LANGUAGE plpgsql SECURITY DEFINER;
If postgres username is not specified in the connection string the name of CURRENT_USER will be used. As plproxy does not know any passwords, the partition databases should trust connections from the proxy database.
3) plproxy.get_cluster_config(cluster_name text)
This is the equivalent of an init file. It should return the configuration parameters as key – value pairs. All of them are optional but you still need the dummy placeholder function:
CREATE OR REPLACE FUNCTION plproxy.get_cluster_config (cluster_name text, out key text, out val text)
RETURNS SETOF record AS $$
BEGIN
    RETURN;
END;
$$ LANGUAGE plpgsql;
The details of configuration parameters and what they do can be found in the plproxy documentation.
Now the setup is complete and we can start playing around with our new cluster.
Let’s create a new table to store usernames on both partitions
#queries_0000=# CREATE TABLE users (username text PRIMARY KEY);
#queries_0001=# CREATE TABLE users (username text PRIMARY KEY);
Also we must create a new function that is used to insert new usernames into the table:
CREATE OR REPLACE FUNCTION insert_user(i_username text) RETURNS text AS $$
BEGIN
    PERFORM 1 FROM users WHERE username = i_username;
    IF NOT FOUND THEN
        INSERT INTO users (username) VALUES (i_username);
        RETURN 'user created';
    ELSE
        RETURN 'user already exists';
    END IF;
END;
$$ LANGUAGE plpgsql SECURITY DEFINER;
Now let’s create the proxy function on the proxy database that will call the partitions
queries=#
CREATE OR REPLACE FUNCTION insert_user(i_username text) RETURNS TEXT AS $$
    CLUSTER 'queries'; RUN ON hashtext(i_username);
$$ LANGUAGE plproxy;
Filling the partitions with random data:
SELECT insert_user('user_number_'||generate_series::text) FROM generate_series(1,10000);
Now if we go to the partition databases we will see that both of them are filled
and the distribution is quite even.
queries_0001 count(*) -> 5071
queries_0000 count(*) -> 4930
To be continued…
About this entry
You’re currently reading “PostgreSQL cluster: partitioning with plproxy (part I),” an entry on <(-_-)> on PostgreSQL
- Published:
- July 27, 2007 / 4:22 pm
- Category:
- cluster, partitioning, plproxy, postgresql
- Tags:

15 Comments
Jump to comment form | comment rss [?] | trackback uri [?]